Adventures in Routing
Inspired by fellow internet-travelers Apalrd and Nick Bouwhuis I decided I need to know more about how the internet works, and perhaps, if this rabbit hole is deep enough, even become autonomous on the internet myself some day.
After learning about all the things related to large internet networks such as IRRs, LIRs, ASNs, PI/PA Prefixes, RPKI, ROA etc. etc. ( – did I mention there’s a LOT of acronyms?) I wanted to try some stuff out for myself.
Simulation
I installed GNS3 on my Debian laptop and quickly had a small lab where I could simulate how routers (Mikrotik CHRs in my case) talk BGP to one another and exchange routes.
Despite the success of the first tests I still wasn’t really satisfied, as it wasn’t ‘real’ and there was no actual traffic flowing over my network, only simulated tests. I wanted to route for real.
DN42
Some resources online suggested to try ‘real-life’ routing on DN42 first. DN42 is an overlay ‘internet-like’ network that uses the same principles as the naked internet, except that peering/transit mostly consists of tunnels between routers (over the ‘naked’ internet) instead of physical interconnects.
So I started to research how to start my own network, otherwise known as AS (Autonomous System) on DN42. Their website has a very helpful Getting Started guide. Turns out the first step involves adding entries into a git repository, that functions as a registry – or like a source of truth for the network. I learned this is not unlike creating database objects in the RIPE database for example. RIPE is the European registry that controls internet resources for the continent, so the one I’d need to deal with if I wanted to start my own ‘real’ AS some day.
After a few small mistakes which were easily corrected, I was able to get my DN42 database objects merged into the registry.
Next step: router!
As I’m by far the most familiar with Mikrotik’s RouterOS, I decided that a virtual router (CHR) would be the perfect way to start my first ‘Point of Presence’ (PoP) in DN42.
I spun up the virtual machine, gave it ipv6 connectivity to the internet, put a basic firewall in place, and created a VRF (Virtual Routing and Forwarding) with a VLAN to host my VMs. This completely separates the routing table and interfaces from the host or other VRFs – in some ways simplifying the setup considerably.
Peering
To connect my new AS to the network I needed peers. Using the DN42 Peer Finder I selected 3 peers. Helpfully, these networks allowed me to authenticate myself using the SSH, and set up my own peering session with them.
After creating the sessions, they provided me with WireGuard tunnel connection details, and BGP session details.
Safe BGP’ing
Before I wanted to try to enable the BGP sessions though, we need to talk about BGP safety!
Turns out it is relatively easy to break the whole network (Internet/DN42 alike), whether accidentally or on purpose. Interesting read.
There’s plenty of great resources online to learn about BGP filtering and other safety measures. NLNOG’s page for instance really makes it easy to learn and even implement straight up examples. Even as a beginner, the fact that not everyone is doing BGP safely seems like laziness to me.
Some rules of course had to be tailor made for the DN42 network, but the wiki has helpful tips on that too.
Before long I had a nice set up rules:
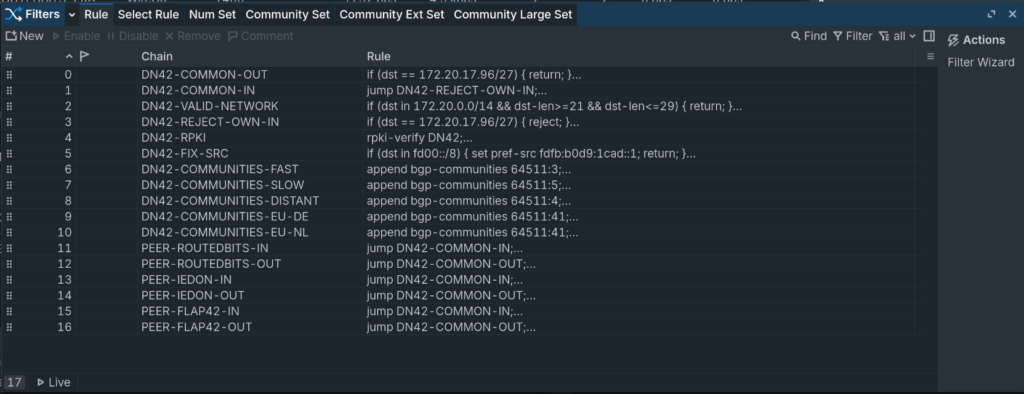
Some highlights:
- Explicitly ONLY send your own ip ranges! Never resend received routes.
- Add a ‘blackhole’ route of your own ranges in the routing table, so that even if the ip ranges go unused, traffic gets dropped neatly.
- Don’t accept routes to your own ip ranges as incoming route.
- Check that incoming routes are valid (subnet length not too long or short for example)
- Lastly, verify RPKI…
RPKI???
As Cloudflare states on their explanation page;
With 800k+ routes on the Internet, it is impossible to check them manually. Resource Public Key Infrastructure (RPKI) is a security framework method that associates a route with an autonomous system. It uses cryptography in order to validate the information before being passed onto the routers.
In DN42, luckily there’s only about 2600 routes, far less than the 800k+ on the naked internet, but still far too many to check manually or using filter rules.
Therefore, it is necessary to implement RPKI. It uses a server that can ‘vouch for’ routes announced by a Peer. It makes sure that routes (ip ranges) can only be announced by the correct AS (Autonomous System). Any routes that are not correct should be removed a.s.a.p., to not allow anyone to hijack someone’s internet resources.
DN42’s wiki has some resources on this too, and helpfully even lists ‘public’ RPKI servers to authenticate incoming routes on my Mikrotik Router.
Time to flip the switch!
After setting up my filters, address-list entries of the routes to announce and RPKI it was time to try my first ‘real’ BGP session, and quickly after numbers 2 and 3.
It’s working!
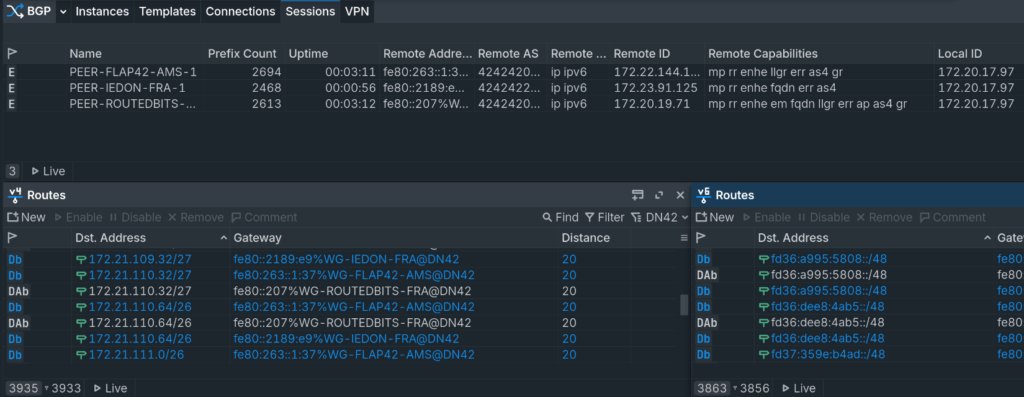
I’m receiving ipv4 and ipv6 routes (including duplicates) from my 3 peers. This way traffic has potentially multiple ways to reach it’s destination, some are more preferable to another, based on standardized BGP route selection rules.
Now what?
Setting up the router is one thing, now it’s time to actually use the network! My network is constantly changing as I work on it, so check my dedicated DN42 page for the current state of things.